

Binding - Step by Step How to finish your quilt
- pillowmemories
- Dec 29, 2021
- 3 min read
There are several methods of how to bind (finish) the edges of a quilt. Here’s a step by step tutorial of how I have learned to do binding all by machine. I know a video would be much more helpful but for now I will show you with pictures and descriptions.
Step 1:
Cut 2 1/2 inch strips - enough to go around the circumference of the quilt plus a bit extra. Step 2: Join the strips with a diagonal seam as shown. This creates less bulk making the seams less noticeable. Trim and Press seams open.

Step 3: Fold the strips lengthwise with wrong sides together and press.
Step 4: Sew the prepared continuous strip (leaving a 10-12” tail for joining later) to the raw edge (raw edges of the strip along raw edge of the quilt) of the quilt using a generous 1/4” seam allowance stopping approximately 10” from where you started and leaving another tail. Using a walking foot or dual feed sewing machine foot is extremely helpful to keep all layers from shifting and causing wonky edges. *CORNERS: Stop 1/4” from the corner (needlle down), turn the corner and back up off the quilt. Fold the binding strip up to the edge of the quilt and then back down. Continue sewing as before.


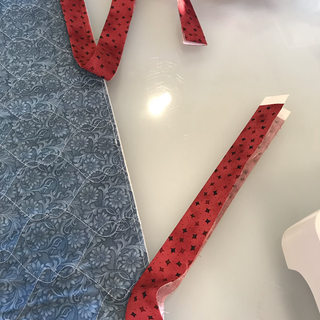


*Example of how to turn the corner


Step 5: Joining the tails. This can seem like a daunting task, but don’t fret. Hopefully this method will help take some of the stress out of the process. I like to join the ends the same way as we joined the initial strips to make a consistent and smooth edge.
• trim each of the ends making sure that there’s at least 2 1/2” overlap (I like to leave a bit extra). A great way to do this is to place a piece of a 2 1/2 strip and cut each end slightly past the edges of the strip width. • mark the edges of extra with a pen
• open the strip end folds and place right sides together making a point (overlapping to line up the “extra” markings to the edges of the other strip)
• pin and stitch corner to corner (mark the diagonal if it helps you sew a straight line). To get the right diagonal I was taught to “cut off the tip of the mountain”. LOL
• trim and press seams open
• refold and finish stitching the joined section to the quilt as you did with the rest.


Step 6: Press binding towards the outside. Step 7: Fold binding around to the back of the quilt just covering your stitching line. Run a thin bead of craft white glue inside the seam allowance and press (I do this in short sections at a time). This eliminates using pins or clips which I find can still shift and cause uneven or even missed unstitched sections. At the corners, fold one edge first, then the other creating a mitred corner. I like to do the mitred folds opposite from the front side of the quilt so that it lies flat.


Step 8: Stitch in the ditch on the front of the quilt using a matching top thread to the quilt and bottom thread to the binding. This should catch the edge of the binding on the back neatly and evenly.


And your quilt is done ✅.
Wow! That seems like a lot of steps but trust me, it’s not that bad. Let me know if this helps you with your machine binding.
If binding still isn’t your thing, leave it to me and I can get it done for you. Or I can attach the binding ready for you to stitch it to the back by hand. Either way, it’s so satisfying to put those last stitched and FINISH a project. Right?